Introduction
Consul is a distributed key-value store, heavily opinionated towards service discovery. If you’re not familiar with the basics of service discovery, Gabriel Schenker, who we’ve had the pleasure of working with, has an excellent introduction to service discovery. In this blog post, we will cover how we set up and expanded our Consul cluster. For more information on utilizing Consul for service discovery, see our blog post that uses Consul, consul-template, and nginx to load balance microservices. Additionally, Hashicorp has produced great documentation for Consul.
The official Consul documentation is excellent, but we had difficulty conceptualizing some of the higher level concepts of clustered systems. Hopefully, a real-world production example of a Consul cluster deployment and modification thereof can clear up any confusion.
Our Current Setup

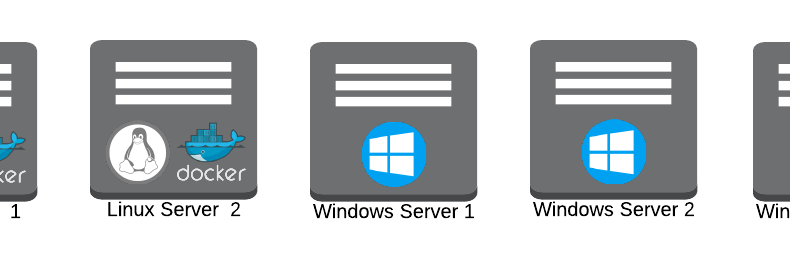
- 2 Linux servers running a Consul server in a Docker container, managed by Chef, an infrastructure automation tool
- 2 Windows servers running a Consul server as a Windows service, managed by Chef
- 1 Windows server running a Consul server as a Windows service managed manually
When we initially created our Consul cluster, it was not recommended to run a Consul server on Windows in production. However, we decided to be adventurous and do it anyway. We have had no problems (that weren’t our fault) and were excited when the bogus warning message was removed.
For deciding how many servers you should have in your cluster, see this deployment table. The recommended deployment count is 3 or 5 servers, each giving you a fault tolerance of 1 or 2 servers respectively. A fault tolerance of 2 allows for 2 servers to go down without bringing down the cluster. 5 servers with a fault tolerance of 2 was the perfect number for our needs, but YMMV. If you ever lose more servers than your fault tolerance allows, you risk losing all data stored in the cluster which could include registered services, key value pairs, and other vital information. From our experience, it has been a lot easier to recover a bad cluster by recreating the entire cluster than attempting to bring it back from the dead.
Setting Up Your First Cluster
We’re going to start off with creating a 3-node cluster, the simplest deployment with a fault tolerance of at least 1.
Docker command for 1st node
docker run --name=consul -d -p 8300-8302:8300-8302 -p 8301:8301/udp -p 8302:8302/udp -p 8400:8400 -p 8500:8500 -p 8600:53/udp -h node1 gliderlabs/consul-server:0.6 -server -bootstrap-expect 3 -ui -advertise 192.168.99.101 -join node1 -join node2 -join node3
Docker command for 2nd node
docker run --name=consul -d -p 8300-8302:8300-8302 -p 8301:8301/udp -p 8302:8302/udp -p 8400:8400 -p 8500:8500 -p 8600:53/udp -h node2 gliderlabs/consul-server:0.6 -server -ui -advertise 192.168.99.102 -join node1 -join node2 -join node3
Docker command for 3rd node
docker run --name=consul -d -p 8300-8302:8300-8302 -p 8301:8301/udp -p 8302:8302/udp -p 8400:8400 -p 8500:8500 -p 8600:53/udp -h node3 gliderlabs/consul-server:0.6 -server -ui -advertise 192.168.99.103 -join node1 -join node2 -join node3
The following configuration differences are important to note:
- -h NODE_NAME: The NODE_NAME is the hostname of the Docker container, which will be used to uniquely identify the node in the cluster. This is a Docker option, not a Consul option.
- -advertise NODE_IP: NODE_IP is the IP address of the Docker host. In his example, we are following the pattern 192.168.99.10X, where X is the node’s number
- -bootstrap-expect N: N is the number of servers necessary to start an election of a cluster leader. A more detailed description is available here. In our implementation, node2 and node3 do not have the bootstrap-expect flag. node1, since it has a bootstrap-expect value of 3, will wait for there to be 3 nodes in the cluster to start an election
Notice that the -join options are identical for all the nodes (they even join themselves). The -join options are a list of the servers that the node can communicate with to join the cluster. While a node will be able to join the cluster by only joining to one existing node in the cluster, a symmetric join list provides for cleaner configuration.
We now have our cluster bootstrapped. We now need to remove node1 to make its configuration identical to the other nodes.
Docker commands for removing bootstrap on 1st node
docker exec consul consul leave
docker rm consul
docker run --name=consul -d -p 8300-8302:8300-8302 -p 8301:8301/udp -p 8302:8302/udp -p 8400:8400 -p 8500:8500 -p 8600:53/udp -h consul1 gliderlabs/consul-server:0.6 -server -ui -advertise 192.168.99.101 -join node1 -join node2 -join node3
Adding More Servers
We wanted to expand our original 3-node cluster into a 5-node cluster to increase our fault tolerance from 1 to 2. We added 2 more servers to our cluster by doing the following:
Docker command for 4th node
docker run --name=consul -d -p 8300-8302:8300-8302 -p 8301:8301/udp -p 8302:8302/udp -p 8400:8400 -p 8500:8500 -p 8600:53/udp -h node4 gliderlabs/consul-server:0.6 -server -ui -advertise 192.168.99.104 -join node1 -join node2 -join node3 -join node4 -join node5
Docker command for 5th node
docker run --name=consul -d -p 8300-8302:8300-8302 -p 8301:8301/udp -p 8302:8302/udp -p 8400:8400 -p 8500:8500 -p 8600:53/udp -h node5 gliderlabs/consul-server:0.6 -server -ui -advertise 192.168.99.105 -join node1 -join node2 -join node3 -join node4 -join node5
Notice that we do not need to include the bootstrap-expect option since we have already bootstrapped the cluster. We also don’t need to update the join list of the original 3 nodes, since new node information is gossiped between all the nodes in the cluster.
Removing Servers
If you want to shrink your cluster size, simply issue a consul leave command on the nodes you want to remove from the cluster.
To downgrade from 5 servers to 3 servers:
Docker command to run on 4th and 5th nodes
docker exec consul consul leave
docker rm consul
Note that this changes your cluster size to 3. This is NOT the equivalent of 2 servers going down in a 5 server cluster. The latter case is a 5 server cluster reaching its maximum fault tolerance, unable to run on just 2 servers. The former case of changing to a 3 server cluster still has a fault tolerance of 1, so running on 2 servers would be acceptable.
Planned vs Unplanned Leaving of the Cluster
Consul nodes can and will leave the cluster for various reasons. The below describes the difference between a planned leave and unplanned leave of the cluster.
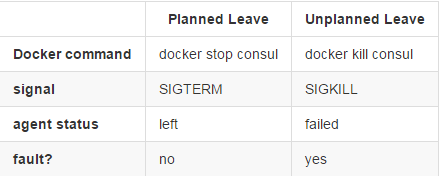
Note: Agents in the left state will be cleaned up by Consul in a process known as reaping, configured by default to occur every 72 hours.
Testing Things Going Wrong
From the perspective of the other nodes in the cluster, the following command simulates most things that can go wrong (VM dies, network partition, power outage, etc).
docker rm -f consul
We learned the most information from Consul by killing random nodes and trying to guess what happened, and investigating why we were almost always wrong. Such an exercise is vital to know how you would act in a disaster recovery situation.
Possible Pitfalls
The following are some issues we ran into with their solutions:
- Chef check-ins. We use Chef to automate setting up our server infrastructure, including Consul. In order to not risk putting the Consul cluster into a bad state, we had to turn off the Chef automatic check-ins and manually manage the update of every Consul node. A check-in turning on a Consul node while it is not yet properly configured can easily ruin your cluster.
- Consul node names. We use Consul within Docker containers when running Consul on Linux. Consul, by default, uses the hostname of the machine (or container) that it is running in. Container hostnames, by default, are randomly generated by Docker. However, Docker allows you to specify the hostname of the container when running it via the -h option (which we used in our examples). We didn’t have this problem on Windows, since our Windows machines are nicely named (and we aren’t using Windows containers…yet).
Conclusion
Creating a Consul cluster can seem a little daunting at first, but once you familiarize yourself with some of the concepts, it will become a powerful asset of your infrastructure.
This blog post was written by both Ivan Valle and Jake Wilke.
[amp-cta id=’8486′]